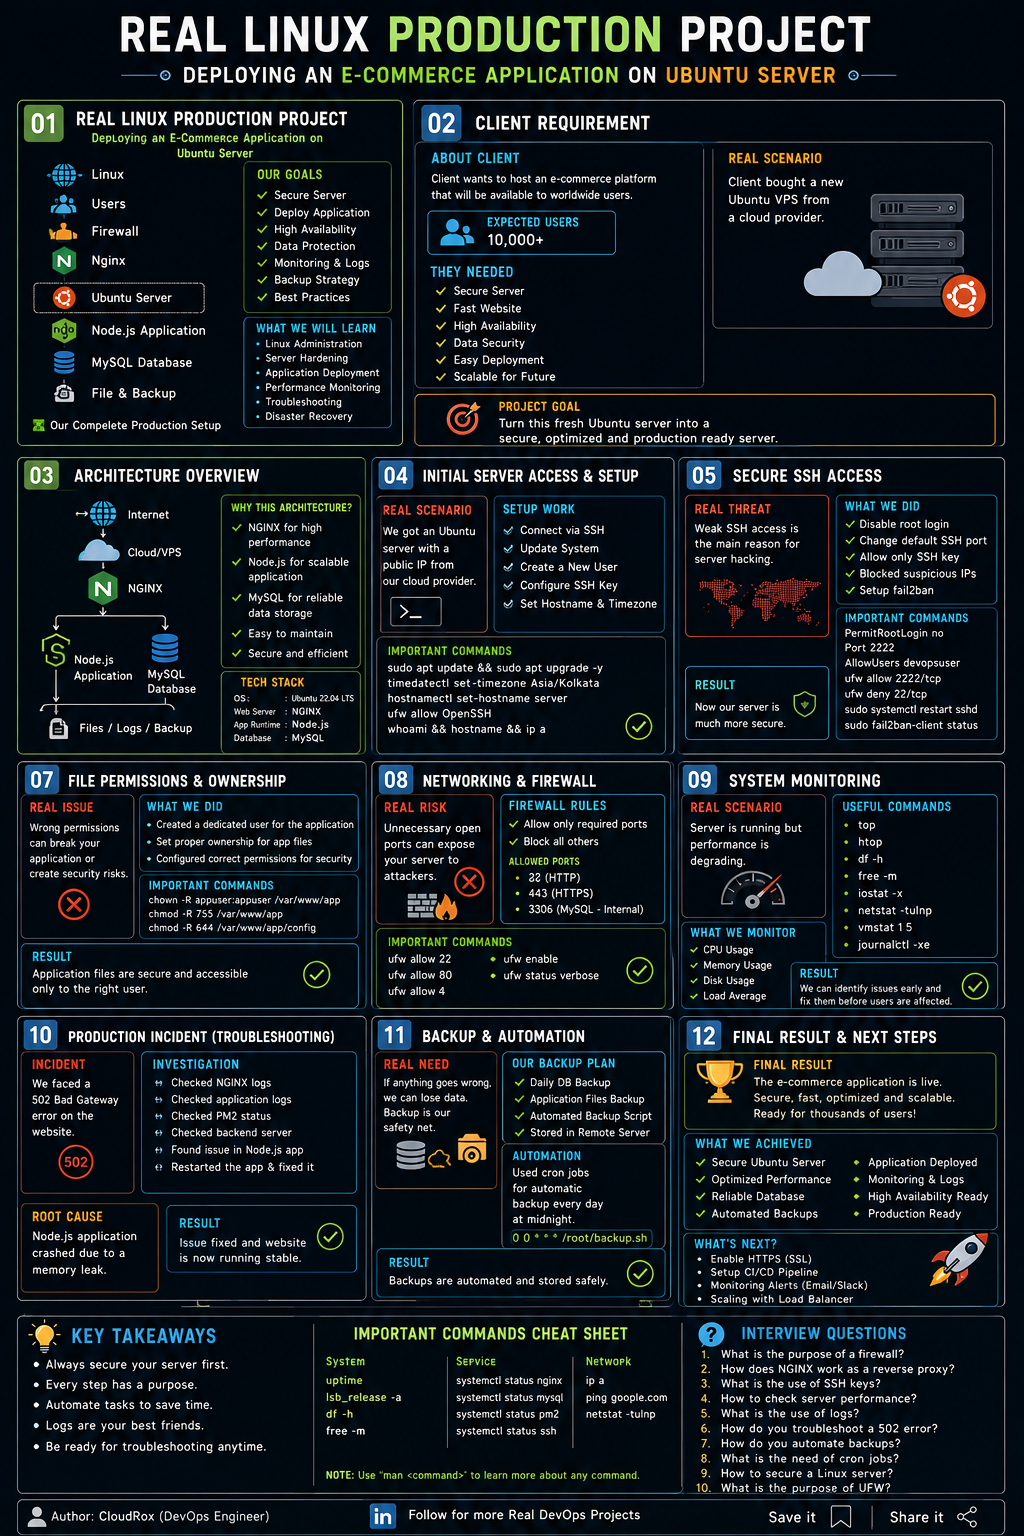
Real Linux Production Project
Deploy a Node.js E-Commerce Application on Ubuntu 24.04 — from a fresh VPS to HTTPS, PM2, MySQL, backups, monitoring and incident recovery.
This is a hands-on project, not a command dump. Every important command is followed by what it does, why you run it, what you should expect, and how to verify it. Follow the sections in order on a fresh Ubuntu 24.04 server.
0. Project Goal
Node.js E-Commerce API
MySQL, local-only access
NGINX reverse proxy
PM2
UFW + SSH hardening
Let's Encrypt / Certbot
1. Architecture
↘ UFW protects exposed ports
↘ backups + logs + monitoring
The browser should never need direct access to MySQL. NGINX accepts web traffic, PM2 keeps the Node.js process alive, and the application talks to MySQL locally.
2. Table of Contents
- Initial server access and user setup
- System update and essential packages
- SSH hardening
- UFW firewall
- MySQL installation and application database
- Node.js application deployment
- PM2 process management
- NGINX reverse proxy
- HTTPS with Certbot
- Monitoring and backups
- Production 502 incident and recovery
- Security checklist and interview questions
3. Initial Server Access & Non-Root User
Start as root only for initial server preparation. The application work should later be performed using a dedicated non-root account.
# Create the deployment user
adduser cloudmart-admin

# Give the user administrative privileges through sudo
usermod -aG sudo cloudmart-admin

# Switch into the new account
su - cloudmart-admin
adduser creates the account and home directory. usermod -aG sudo adds the account to Ubuntu's sudo group. su - starts a login shell for the new user.
Run whoami. It should return cloudmart-admin.
4. Update Ubuntu & Install Essential Tools
sudo apt update
sudo apt upgrade -y

# Common tools used during deployment
sudo apt install -y curl git unzip htop ufw build-essential ca-certificates gnupg
apt update refreshes package metadata. apt upgrade installs available updates. curl tests HTTP endpoints, git retrieves source code, ufw manages the firewall and htop helps inspect resources.
lsb_release -a
ufw version
git --version
5. SSH Hardening
Before changing SSH, make sure you have a second SSH session available. A mistake in sshd_config can lock you out.
sudo nano /etc/ssh/sshd_config

# Set the following values
Port 2222
PermitRootLogin no
PasswordAuthentication no

# Validate the SSH configuration BEFORE restarting
sudo sshd -t

# Restart SSH only after the validation succeeds
sudo systemctl restart ssh
Changing the port reduces automated noise; disabling root login removes direct root SSH access; disabling password authentication forces key-based login.
ssh -p 2222 cloudmart-admin@YOUR_SERVER_IP
Do not close your existing working session until the new connection succeeds.
6. UFW Firewall
Allow only the ports that are actually required. In this architecture, the public application is reached through NGINX, so Node.js port 3000 does not need to be publicly exposed.
sudo ufw default deny incoming
sudo ufw default allow outgoing

sudo ufw allow 2222/tcp
sudo ufw allow 80/tcp
sudo ufw allow 443/tcp

sudo ufw enable
sudo ufw status verbose
2222 = SSH administration, 80 = HTTP/ACME and redirect traffic, 443 = HTTPS. Port 3000 stays internal.
UFW should show only the required inbound rules as allowed.
7. MySQL Installation & Secure Database
sudo apt install mysql-server -y
sudo mysql_secure_installation

# During the security wizard, remove anonymous users,
# disallow remote root login and remove the test database.

sudo mysql
The secure-installation wizard removes common default exposure. The application should use its own database account instead of the MySQL root account.
sudo systemctl status mysql --no-pager
CREATE DATABASE cloudmart_db;

CREATE USER 'app_user'@'localhost'
IDENTIFIED BY 'YOUR_STRONG_PASSWORD';

GRANT ALL PRIVILEGES ON cloudmart_db.*
TO 'app_user'@'localhost';

FLUSH PRIVILEGES;
EXIT;
CREATE DATABASE creates the application's database. CREATE USER creates a dedicated login. GRANT gives that user access only to the application database. FLUSH PRIVILEGES reloads privilege information.
sudo mysql -e "SHOW DATABASES;"
Do not publish your real password in source code or tutorials.
8. Prepare & Deploy the Node.js Application
The application is assumed to be available in /var/www/cloudmart. In a real project, obtain the source from your Git repository or your approved deployment artifact.
sudo mkdir -p /var/www/cloudmart
sudo chown -R cloudmart-admin:cloudmart-admin /var/www/cloudmart

# Enter your application directory
cd /var/www/cloudmart

# Install Node.js and npm from Ubuntu repositories for this lab
sudo apt install nodejs npm -y

# Confirm versions
node --version
npm --version

# Install application dependencies
npm install
The directory becomes the application home. Ownership is given to the deployment user so the app does not need to run as root. npm install reads package.json and installs dependencies.
Run the application manually, confirm it listens on the expected port, then stop it before handing it to PM2.
9. Environment Configuration
Keep database credentials outside the public repository. A typical application configuration should point to the local MySQL service.
nano .env

# Example values — replace them with your real deployment values
NODE_ENV=production
PORT=3000
DB_HOST=127.0.0.1
DB_PORT=3306
DB_NAME=cloudmart_db
DB_USER=app_user
DB_PASSWORD=YOUR_STRONG_PASSWORD
10. PM2 Process Manager
sudo npm install -g pm2
cd /var/www/cloudmart

pm2 start app.js --name "cloudmart-api"
pm2 status
pm2 logs cloudmart-api --lines 50

# Make PM2 start after reboot
pm2 save
pm2 startup
PM2 keeps the Node.js process under supervision, provides status/log commands and can restore the process after a reboot when startup integration is configured.
pm2 status should show cloudmart-api as online.
11. NGINX Reverse Proxy
Users should not connect directly to port 3000. NGINX becomes the public entry point and forwards requests internally to Node.js.
sudo apt install nginx -y
sudo nano /etc/nginx/sites-available/shop.cloudrox-lab.com
server {
    listen 80;
    server_name shop.cloudrox-lab.com;

    location / {
        proxy_pass http://127.0.0.1:3000;
        proxy_http_version 1.1;
        proxy_set_header Host $host;
        proxy_set_header X-Real-IP $remote_addr;
        proxy_set_header X-Forwarded-For $proxy_add_x_forwarded_for;
        proxy_set_header X-Forwarded-Proto $scheme;
    }
}sudo ln -s /etc/nginx/sites-available/shop.cloudrox-lab.com /etc/nginx/sites-enabled/ # ALWAYS test before reload/restart sudo nginx -t sudo systemctl reload nginx
A syntax error in an NGINX configuration can prevent reloads. nginx -t validates the configuration before applying it.
curl -I http://127.0.0.1:3000
curl -I http://shop.cloudrox-lab.com
12. DNS & HTTPS
Before requesting a certificate, your domain must resolve to the VPS. Replace the example domain with your real hostname.
# Install Certbot if it is not already installed
sudo apt install certbot python3-certbot-nginx -y

# Request and configure the certificate
sudo certbot --nginx -d shop.cloudrox-lab.com

# Verify renewal configuration
sudo certbot renew --dry-run
It requests a Let's Encrypt certificate and can update the NGINX configuration to serve HTTPS. The domain must point correctly to the server and port 80/443 must be reachable.
Open https://shop.cloudrox-lab.com and check the certificate in the browser.
13. Monitoring the Production Server
# Interactive CPU/RAM/process view
htop

# PM2 application status
pm2 status

# Application logs
pm2 logs cloudmart-api --lines 50

# NGINX errors
sudo tail -n 50 /var/log/nginx/error.log

# NGINX access requests
sudo tail -n 50 /var/log/nginx/access.log

# Service health
sudo systemctl status nginx --no-pager
sudo systemctl status mysql --no-pager
Do not troubleshoot by guessing. Start at the layer where the failure occurs: DNS → NGINX → local Node.js port → PM2 → application logs → database connectivity.
14. Database Backup
A deployment is not production-ready if the database cannot be restored. Create a protected backup location first.
sudo mkdir -p /backups
sudo chown cloudmart-admin:cloudmart-admin /backups

# Test a manual backup first
mysqldump -u app_user -p cloudmart_db > /backups/cloudmart_db.sql

# Check the backup file
ls -lh /backups/cloudmart_db.sql
Schedule the Backup
crontab -e

# Example: run every day at 02:00
0 2 * * * mysqldump -u app_user -pYOUR_DB_PASSWORD cloudmart_db > /backups/cloudmart_db.sql
For a serious production environment, prefer a secure secret mechanism rather than storing credentials in a crontab. Also copy backups to separate storage; a backup on the same VPS does not protect you from disk or server loss.
15. Production Incident: 502 Bad Gateway
A 502 from NGINX often means NGINX is healthy but cannot reach the upstream application. This is where systematic troubleshooting matters.
# Step 1: Reproduce the problem
curl -I https://shop.cloudrox-lab.com

# Step 2: Inspect NGINX errors
sudo tail -n 50 /var/log/nginx/error.log

# Step 3: Check whether Node is managed by PM2
pm2 status

# Step 4: Read the application logs
pm2 logs cloudmart-api --lines 50
Example: File-Watcher Limit
# Example remediation when logs explicitly show ENOSPC
# and "System limit for number of file watchers reached"
echo fs.inotify.max_user_watches=524288 | sudo tee -a /etc/sysctl.conf
sudo sysctl -p

pm2 restart cloudmart-api
pm2 status

# Test the public endpoint again
curl -I https://shop.cloudrox-lab.com
16. Production Security Checklist
17. Troubleshooting Decision Tree
↓
Domain resolves but 502 → check NGINX error.log
↓
NGINX cannot connect to :3000 → check PM2 + Node app
↓
PM2 errored → read pm2 logs
↓
Node starts but database fails → check MySQL + .env + credentials
↓
Application works locally but not publicly → check NGINX + UFW + DNS/HTTPS
18. Interview Questions You Should Be Able to Answer
- Why use NGINX in front of Node.js?
It provides a public HTTP/HTTPS entry point and reverse-proxies traffic to the internal Node.js process. - Why should MySQL not be exposed publicly?
The application can access it locally, so there is no reason to expose the database port to the Internet. - Why use PM2?
It supervises the Node.js process, exposes operational status/logs and supports startup recovery. - Why run nginx -t before reload?
To catch configuration errors before applying the new configuration. - What does a 502 from NGINX tell you?
Often that the reverse proxy cannot obtain a valid response from its upstream application; logs are needed to confirm the exact cause. - Why use a dedicated MySQL user?
It follows least privilege and avoids giving the application unnecessary root-level database access. - Why is a same-server backup insufficient?
A disk/server failure can destroy both the live database and its local backup.
19. Final Verification
# OS
uname -a

# Firewall
sudo ufw status verbose

# MySQL
sudo systemctl is-active mysql

# Node / PM2
pm2 status

# NGINX
sudo nginx -t
sudo systemctl is-active nginx

# HTTPS
curl -I https://shop.cloudrox-lab.com
20. Conclusion
You have now walked through the complete operational path: fresh Ubuntu server → non-root administration → SSH hardening → firewall → MySQL → Node.js → PM2 → NGINX → HTTPS → monitoring → backups → real incident troubleshooting.
CloudRox • Practical DevOps, Cloud & Linux Engineering